
Two-factor authentication (2FA) adds a second step when signing in. As well as a password, each user confirms their identity with a one-time code from an authenticator app or by email. Even if someone guesses or steals a password, they can't access the account without that second factor.
Why enable it?
Your Virtualbadge.io account is where your team creates, manages, and issues digital badges and certificates. Requiring 2FA protects those accounts and the credentials you issue if a password is ever compromised. We recommend enabling it for everyone in your organisation.
Supported methods:
- Authenticator app: such as Microsoft Authenticator or Google Authenticator. This method is always available and can't be turned off at the organisation level.
- Email: a code sent to the user's email address. This method is optional and can be switched on or off by an organisation admin.
If both methods are enabled, the authenticator app takes priority, users sign in with the app.
A. How to enable 2FA for your organisation
- Go to Settings → Users and Roles.
- Turn on the two-factor authentication requirement.
- In the confirmation dialog, select Require.
When you turn the requirement on, 2FA becomes mandatory for every user in your organisation who hasn't already set it up. There's no grace period, anyone not yet enrolled is prompted to set it up on their next login. The dialog also tells you how many users still need to enroll.
What your users see when they set up 2FA
The next time an affected user signs in, they're guided through setup.
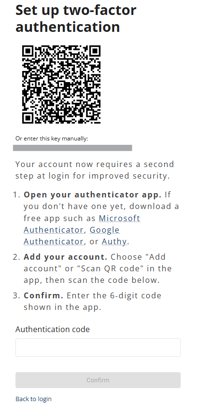
1. Set up an authenticator app
On the Set up two-factor authentication screen, the user:
- Opens their authenticator app. If they don't have one, they can download a free app such as Microsoft Authenticator or Google Authenticator.
- Chooses Add account or Scan QR code in the app, then scans the QR code shown, or enters the setup key manually.
- Enters the 6-digit code from the app and selects Confirm.
2. Save recovery codes
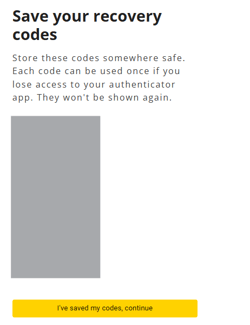
After confirming, the user is shown a set of one-time recovery codes. Each code can be used once to sign in if they lose access to their authenticator app. The codes are shown only once, so they should be stored somewhere safe. The user then selects I've saved my codes, continue to finish.
B. Using email as a 2FA method
If you'd like users to be able to receive codes by email:
- Go to Settings → Users and Roles (Allowed methods).
- Turn on Allow email as a two-factor authentication method.
The authenticator app is always available and can't be turned off. If both the app and email are enabled, sign-in uses the authenticator app.
Turning 2FA off
Disable the organisation requirement
To stop requiring 2FA for your organisation, turn off the requirement and select Disable in the confirmation dialog.
Note that disabling the requirement means accounts without 2FA lose that second layer of protection. If your organisation is also covered by a platform-wide 2FA requirement, those users stay required regardless of this setting.
Turn off email as a method
To remove email as an option, turn off Allow email as a two-factor authentication method and select Turn off. Any users currently enrolled with email will need to set up another method on their next login.