The Designer section empowers you to fully customize your credentials with a variety of elements, including dynamic and static text, profile photos, branded graphics, QR codes, and additional design features.
Features and tools available in the Designer section
1. Overview
- What it is: A comprehensive overview of all components included in your credential template

2. Uploads
- What it is: Within this tab, you can upload background images for certificates and badges, organization logos, SVG files, and additional graphical elements. These resources are essential for customizing the visual identity of your credential, ensuring your branding is seamlessly integrated into each issued certificate or badge.

- Tip: For optimal results, we recommend uploading a blank credential background (without any text) and then recreating all text elements directly using our Designer. This approach preserves the clarity and quality of your credential.
- Manage Elements: Leverage positioning tools to arrange and layer elements according to your design preferences. Adjust transparency, lock elements in place, remove or delete components, and use the copy style feature for consistent formatting.
![]()
3. Text
-
What it is: Use this element to add all static text to your credential template. Static text refers to content that remains the same for every recipient and does not vary between issued credentials.

-
You can further customize your text by adjusting color, font, size, alignment, and style. The Effects options allow you to apply enhancements such as blur, text stroke, background color, or shadows for greater visual impact.
- Can't find the font you use, check out how you can add "Custom Fonts".
4. Dynamic Content
- What it is: Add preset dynamic fields such as recipient name, ID number, issue date, expiration date, and more to your credential template.
- You can also create custom dynamic fields by selecting the "Add dynamic text" button at the bottom of the section.
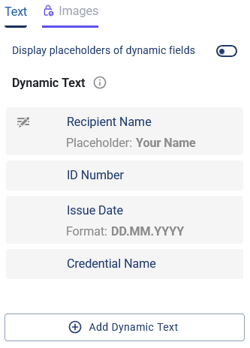
- Note: After a credential has been associated with a training or recipients have already been added, you are unable to add new custom dynamic text fields to that credential. To include additional dynamic fields, simply duplicate the credential and make your changes in the new version.
5. Profile Picture
-
What it is: If social media integration is enabled, recipients have the option to add their profile pictures to the credential. Simply include a designated space for the profile image in your template layout.

- Behaviour: When the recipient receives their credential email and authentication is enabled, their profile picture will be automatically sourced from their LinkedIn or Facebook profile and displayed on the certificate. If authentication is not enabled, recipients can manually upload their profile image. If a recipient does not provide an image, no placeholder will appear on the credential. In both scenarios, there is an option to edit the image before the credential is finalized.
6. Signature
-
What it is: Add a handwritten signature directly onto the certificate, or upload an image file of a signature for a professional and personalized touch.

7. Elements
-
What it is: Add a variety of design elements—including shapes, icons, or lines—to enhance the visual appeal and clarity of your credential template.

8. QR Code
-
What it is: In the Designer, you can choose between two types of QR codes: one that, when scanned, directs users to the recipient’s unique validation page, and another that redirects to a custom URL you specify. Be sure to provide the appropriate link for custom QR codes to ensure accurate redirection.

9. Settings
-
What it is: Access additional tools such as rulers, grid lines, tooltips, and save settings to improve layout precision and streamline your design workflow.
10. Add Additional Pages to the Certificate
- Some certificates require multiple pages for extra course details, scores, or other information. Use the "Add" icon to insert a new page, or select "Duplicate" to copy an existing page and customize it as needed.
Note: This function is only available if no recipients have been added to the certificate yet.

Finalizing the Credential Template
Once your design is complete, you can download a sample version to review its appearance and make any necessary adjustments. After saving your template, proceed to the next step to customize the recipient experience.![]()
Note: Changes made to the certificate or badge after recipients have been added will only apply to newly added recipients. If you would like these changes to apply to both existing and new recipients, please contact our support team.