If you're encountering issues uploading recipient information, it might be due to special characters, extra spaces, or incorrect CSV formatting. In this guide, we’ll show you how to save your CSV file as "UTF-8" to ensure smooth uploading of your recipient details for certificates or badges.
Here’s why you might face issues when uploading recipient information and how to resolve it:
Special characters or extra spaces in your CSV file can cause the upload to fail, or you might see an error code like 4332. To avoid these issues, follow the steps below to ensure your CSV file is properly formatted.
Steps to Upload Recipients Correctly:
-
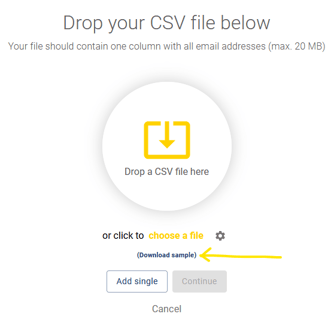
Download the Sample CSV
A quick and easy solution is to use the "Sample CSV" file. This file already contains the correct headings (dynamic fields) for the certificate or badge design, so all you need to do is enter your recipient details. The sample CSV is pre-formatted as CSV UTF-8, so you don't need to make any additional changes.
2. Using Your Own Excel Sheet:
-
Save as CSV with UTF-8
If you’re working with your own Excel sheet, ensure that your file is saved as CSV UTF-8. This ensures compatibility with the system and prevents issues with special characters. Your CSV should include at least the recipient’s name and email, but feel free to add additional columns for any custom dynamic fields in your design.To save your Excel sheet as CSV UTF-8, follow the instructions in the image provided (or refer to Excel’s “Save As” option and choose CSV UTF-8).

To save your Google Sheets file as a CSV in UTF-8 format, follow these steps:
- Click on File in the top-left corner of your Google Sheets window.
- Select Download from the dropdown menu.
- Choose Comma-separated values (.csv, current sheet).
This will export your file as a CSV, ensuring the proper formatting for upload.

- Match Headings with Dynamic Fields
Make sure the column names in your Excel file match the dynamic fields you've used in your certificate or badge design. The column headings don't have to match exactly, but they should align with the dynamic fields in your template. This helps the system map the recipient data correctly when you upload the CSV.
-png.png?width=1116&height=493&name=Email%20mapping%20fields(1)-png.png)
3. Use Virtualbadge.io’s CSV Converter
If you haven't added recipients yet, you can use the UTF-8 Converter available in the Recipients Tab. To access it:
- Go to the Recipients Tab in your account.
- Click on the UTF-8 Converter and upload your Excel sheet.

- Download the converted CSV file and re-upload it.
If you've already added recipients and want to convert your file, click "Add Recipients" in the top right corner, then select "Add List" and follow the same process.

By saving your CSV file as UTF-8 and following these simple steps, you can ensure your recipient information is properly formatted and uploaded to Virtualbadge.io. This will help you avoid errors and guarantee that your recipients are correctly added to your certificates and badges.