Welcome to Virtualbadge.io! Whether you're new or exploring our trial, this guide will walk you through setting up and issuing your first digital credentials.
This document will cover:
- Creating Your First Certificate or Badge
- Setting Up the Recipient Experience
- Adding Recipients
- Managing a Credential
- Filling in Organization Information
- Explore Additional Features
Go to the Dashboard, and
Click the dropdown next to 'Create New Certificate' and choose whether you'd like to start with a certificate or a badge.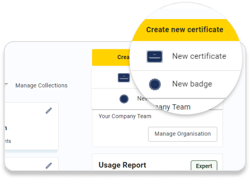
1. Creating Your First Certificate or Badge
a. Fill in the Basic Details
Enter essential details like the credential name, issue date, custom URL slugs, reply email, and upload your organization's logo. Configure social sharing settings to enhance visibility.”

b. Designing Your Credential
In the Designer, you can:- Upload a custom background or select from available templates.
- Incorporate static text and dynamic fields (e.g., recipient name, course title) to personalize each credential.
- Enable the option to include profile pictures.
- Add a QR code linking to the validation page or a custom URL.
Once the design is complete, proceed to the next step to configure email and social media settings.

2. Setting Up the Recipient Experience
The Recipient Experience tab consists of three sections:
a. Email Setup
The Content section lets you manage the information on the email that is sent to recipients for accessing their credentials.
You can edit the following parts of the email:
- Header
- Subject line
- Content (Body)
- Footer
To include custom links in your email content, please reach out to our support team for assistance.
Using the Style section, you can choose from different email templates and customize the color of the call-to-action button.

b. Social Media Posts
- Here, you can choose the social media platforms where recipients can share their credentials.
- You can provide suggested post text and hashtags.
- Recipients can add their credentials to their LinkedIn profiles under the 'Licenses and Certifications' section by clicking the 'Add to LinkedIn' button.

c. Validation Setup
This page shows the credential's status and key details and is the first thing viewers see when clicking on a shared post (e.g., on LinkedIn).
You can customize the information displayed on this page to meet your needs.

3. Adding Recipients
You can add recipients once the setup is complete. Virtualbadge.io offers several ways to upload recipient information:
- Single Entry: Add one recipient at a time manually.
- CSV Upload: Import multiple recipients by uploading a UTF-8 encoded CSV file. Ensure the file includes necessary headers like 'Name' and 'Email'. A sample CSV template is available for reference.
- Third-Party Integrations: Automatically sync recipient data from connected tools like CRMs or learning platforms.
This document will help you understand how to add and upload recipients.
Once you've sent the certificates, here's what their statuses mean.

4. Managing a Certificate with the Overview tab
The Overview Tab provides a comprehensive summary of your certificate or badge, including:
- Basic Details: Certificate name, total recipients, availability date, and status (Paused/Active).
- Actions: Duplicate, delete or mark it as 'Ended' to prevent further issuance.
5. Filling in Organization Information
Easily add your organization settings by clicking "Manage Organization" or navigating to Account → Settings.
Complete all sections under 'Settings' to ensure consistent information across all credentials, reducing repetitive data entry.
- Organization:
General Information: Company Details, Slug, Paper Format, Colors, Logo.
Export Recipient Data: Manage and download recipient information. - Users & Roles:
Invite and manage team members. - Billing:
Manage subscriptions, view invoices, and update payment details. - Integrations & More (Depends on the plan):
Integrations: API, Zoom, and third-party tools (Zapier).
Trainer Module: Manage Activation Period, Recipient Forms, and Approval Types.
Ability Atlas: An internal skill management platform for professional service firms.
6. Explore Additional Features
Virtualbadge.io offers several advanced features to enhance your certificate management, including:
- Custom Validation Page (Enterprise Plan)
- Custom Sending Domain (Enterprise Plan)
- Digitally signed Certificates (Enterprise Plan)
- Certificate PDFs as Email Attachments (Enterprise Plan)
- Custom Fonts (Enterprise Plan)
- API Integration (Growth Plan)
- Zoom Meetings & Webinars (Growth Plan)
- Enterprise SSO (Enterprise Plan)
- Trainer Module (Plus Plan)
- Ability Atlas (Enterprise Plan)
To learn more about these features or to request access, please contact us at contact@virtualbadge.io
Or submit a request through our support portal here.
Setting up your Virtualbadge.io account is easy with our step-by-step guide. We’re here to help you every step of the way!